Product License Activation Guide (Step-by-step License Process)
This guide walks your License Administrator through the Step-by-step process to successfully activate your Vyoma product license on your secure, offline server.
The entire activation is divided into four easy-to-follow phases:
Stage 1: Registration and License Generation (Online)
This initial phase is completed online using the Vyoma SaaS Portal.
| Step | Action | Key Tool/File | Visual Reference |
|---|---|---|---|
| 1. | Buy a plan with a company email address meant for the administrator account on the Vyoma SaaS Portal. | Pricing Calculator |
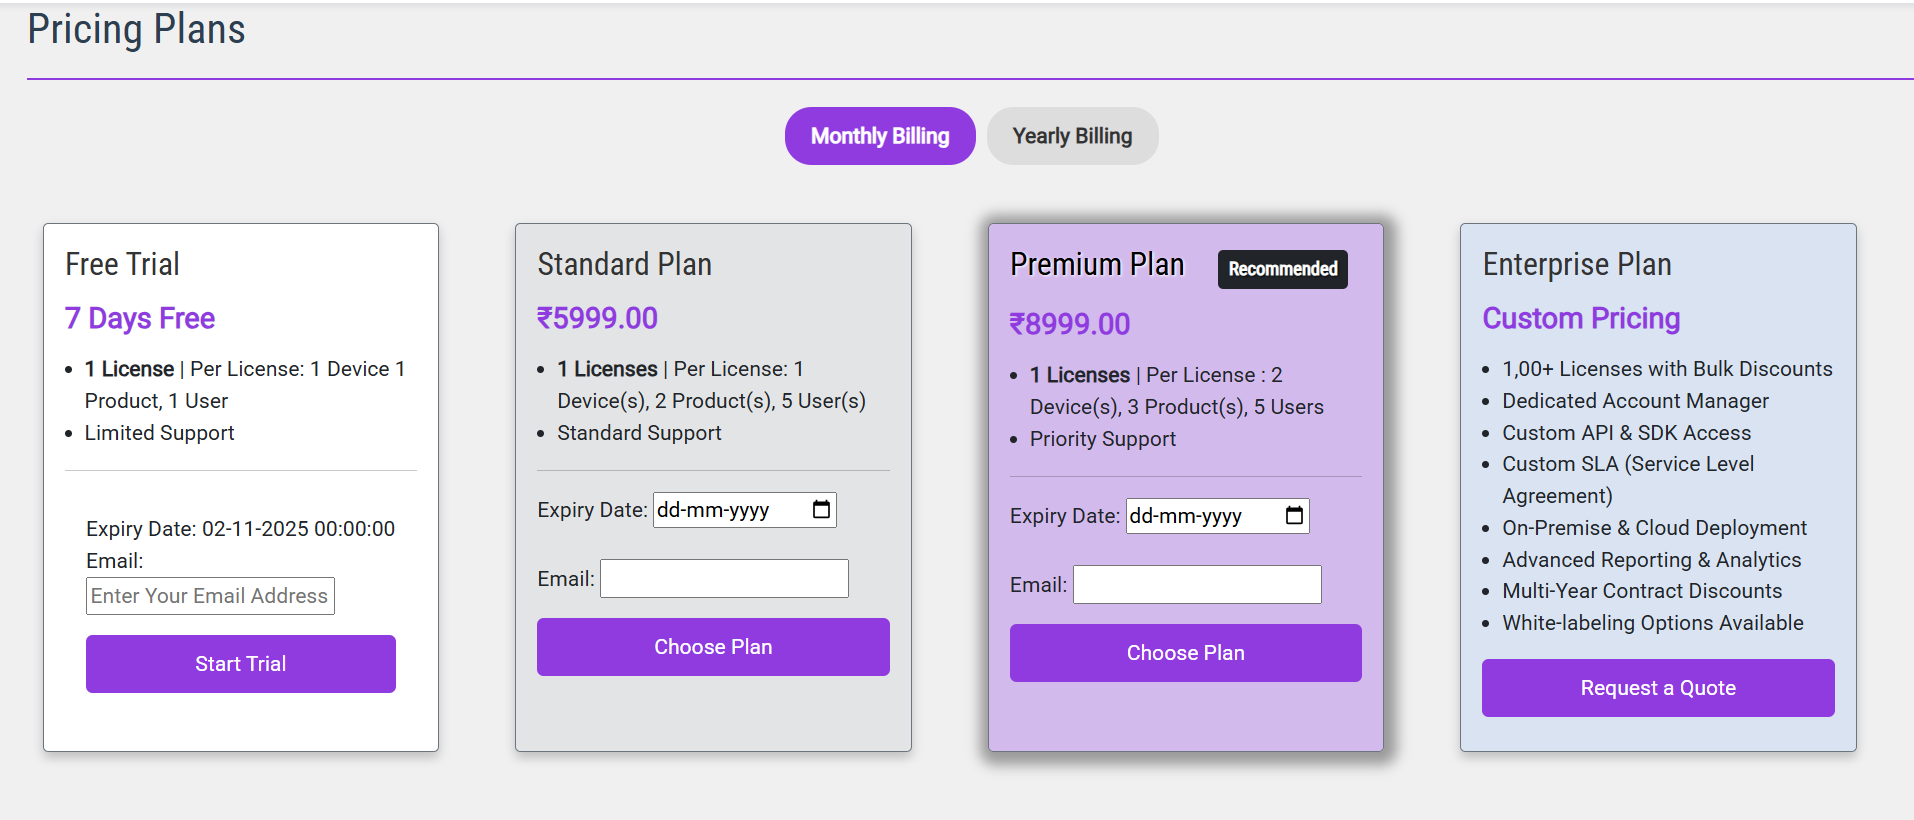
[Screenshot: Pricing Calculator Screen] |
| 2. | Define Your License: Navigate to the license management section, define the Domain, list the Products (URLs), and specify the User List. Finally, Generate the License Code. | License Code (Text) |
Conceptual Graphic: Form with Domain, Products, Users fields and a "Generate License Code" button. |
Stage 2: Client Installation (Offline Server)
Set up the license client on your secure, dedicated offline server.
| Step | Action | Key Tool/File | Visual Reference |
|---|---|---|---|
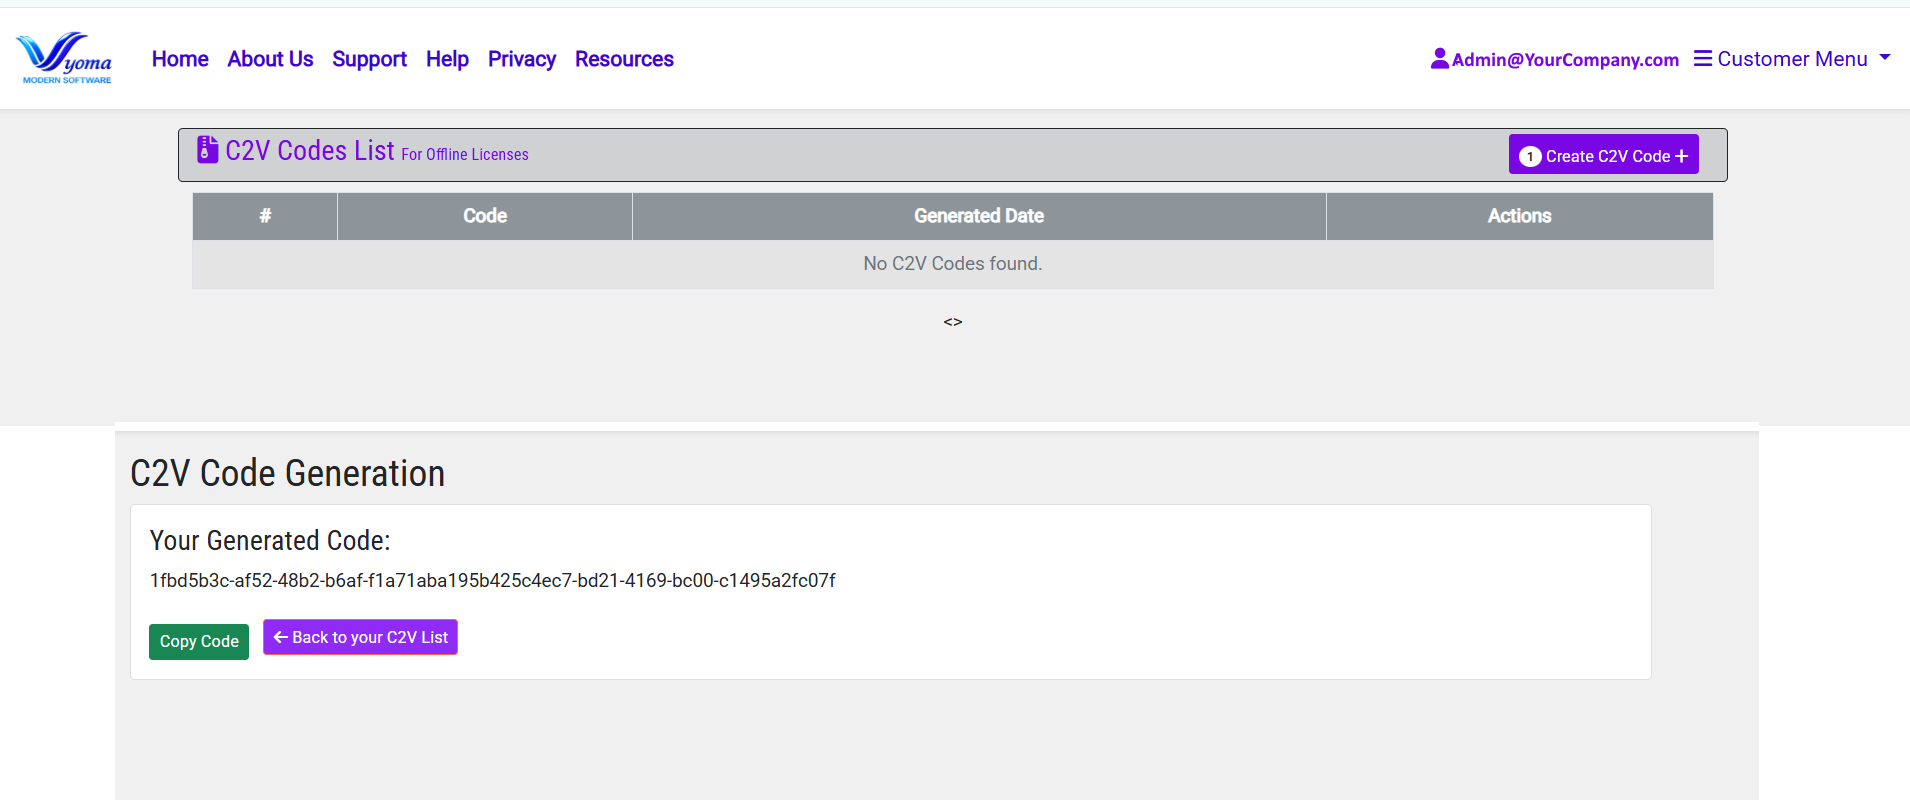
| 3. | Download the Client Application Installer from the SaaS Portal. | Client App Installer |
[ Screenshot: Download Page for the Client App] |
| 4. | Install the Client Application on your dedicated server where your products/applications are hosted. | Installed Client App |
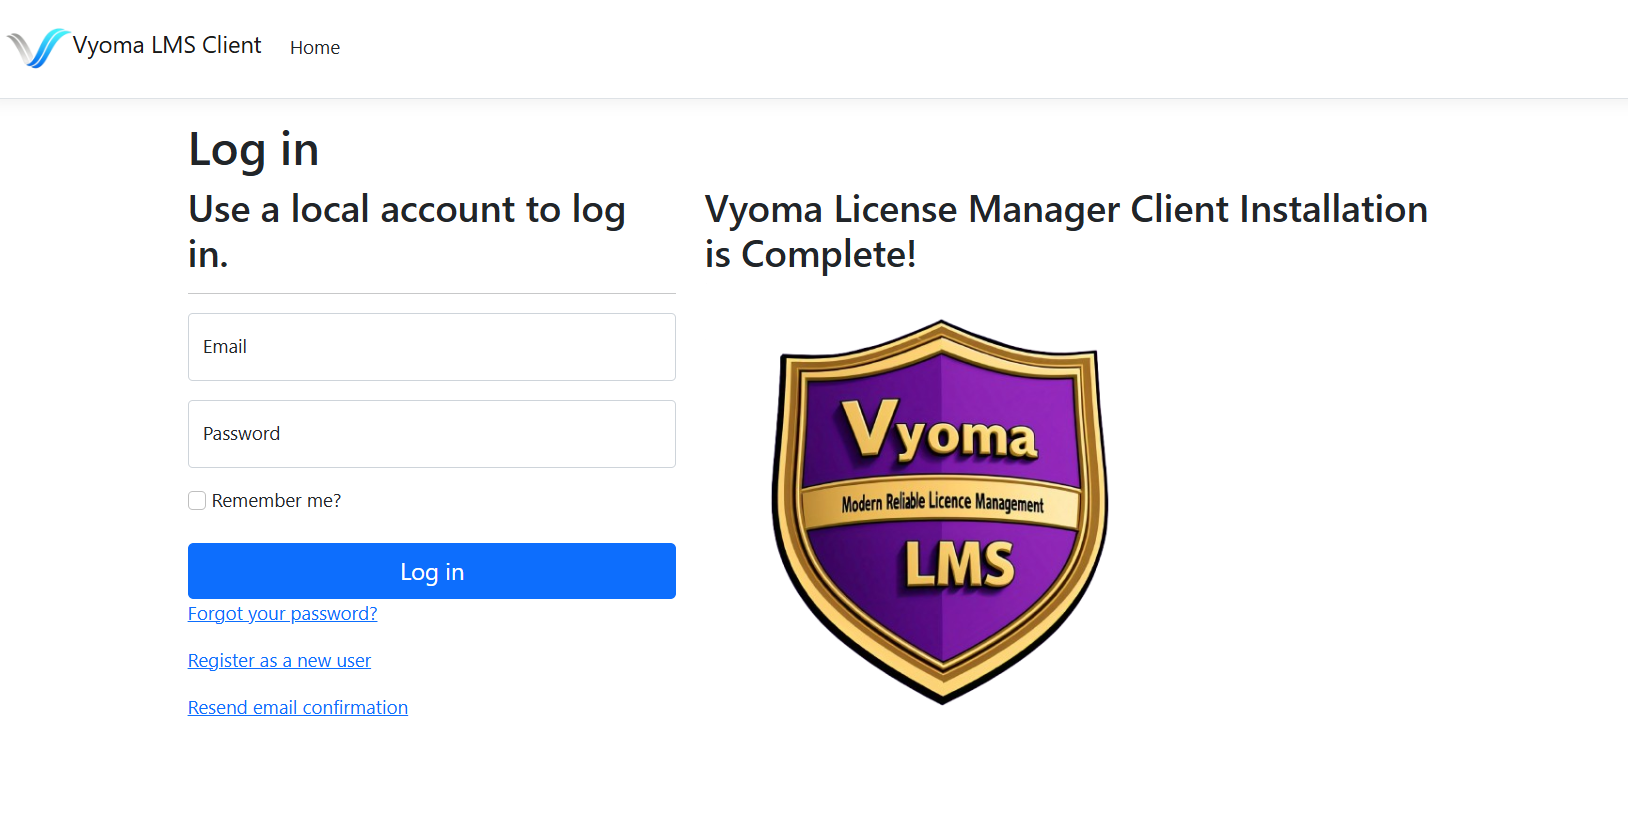
[Screenshot: Client App Installation Complete screen] |
Stage 3: The C2V/V2C Exchange (Activation Loop)
This is the core activation. You'll transfer two files, C2V and V2C, to finalize the license.
| Step | Action | Key Tool/File | Visual Reference |
|---|---|---|---|
| 5. | Upload the License Code (from Step 2) into the installed Client Application on your server. | License Code |
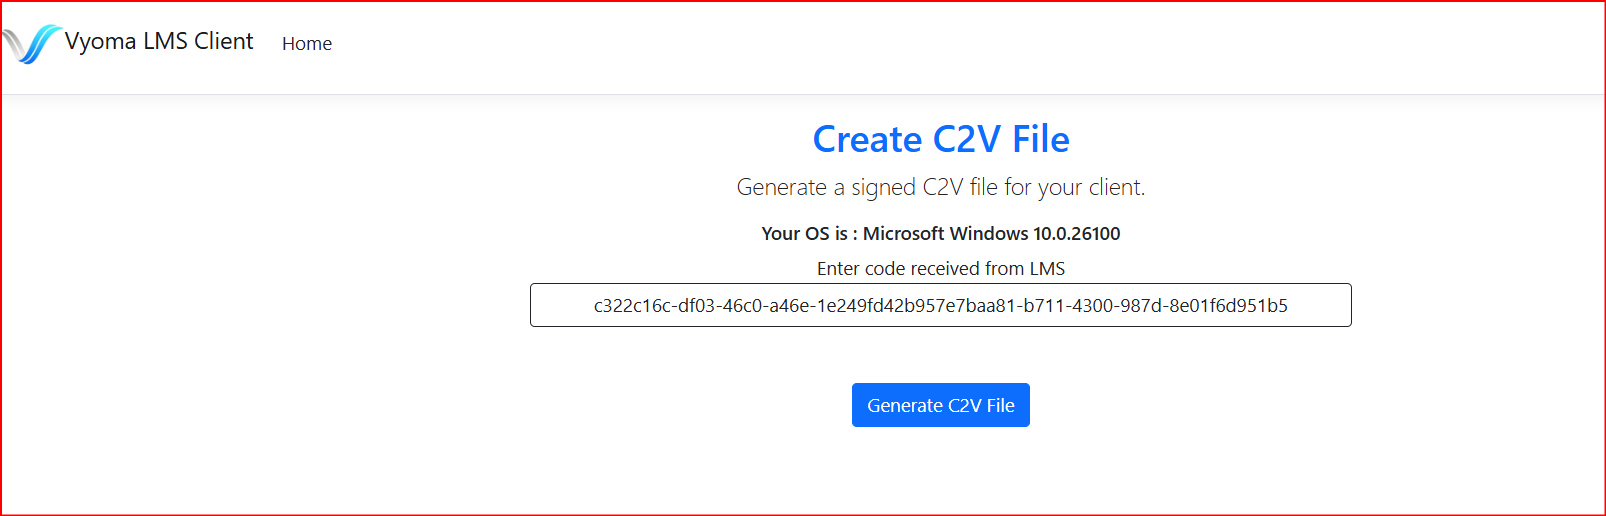
[Screenshot: Client App field for entering the code] |
| 6. | Transfer and Upload: Take the C2V file off the server and Upload it to your account on the online SaaS Portal. | C2V File & SaaS Portal |
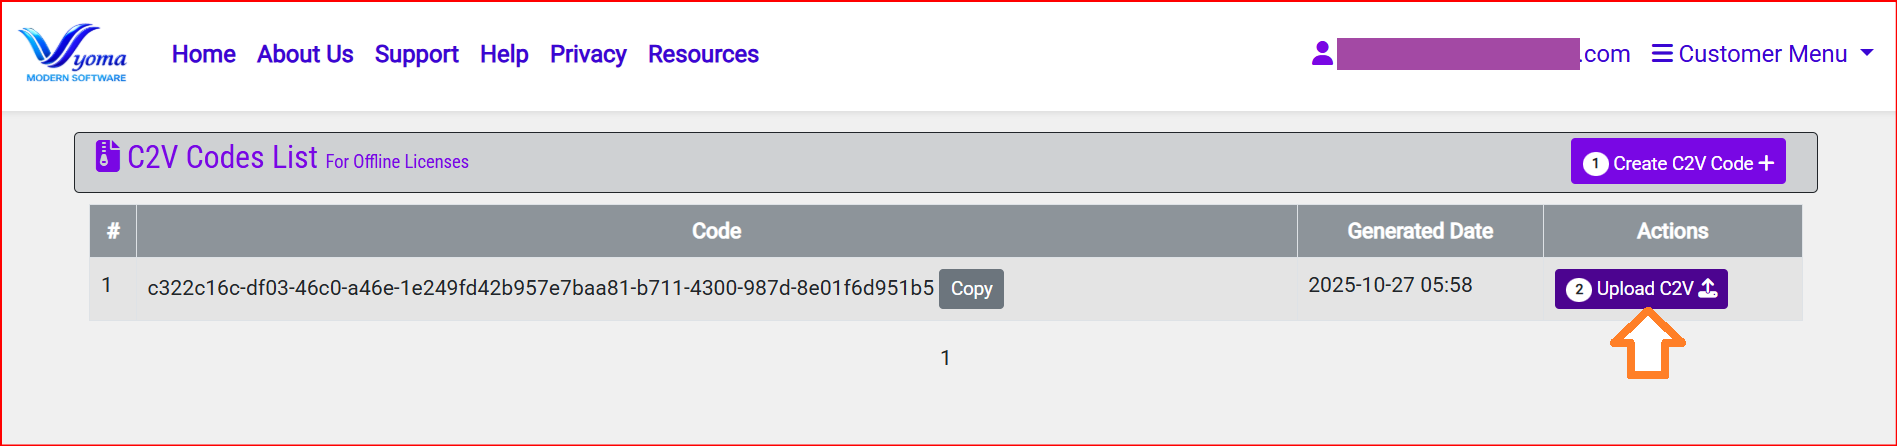
[Screenshot: Upload C2V File on SLM Portal.] |
| 7. | The SaaS Portal processes the C2V and Provides A Form to Enter params like Named Users, Number of users etc. | V2C File |
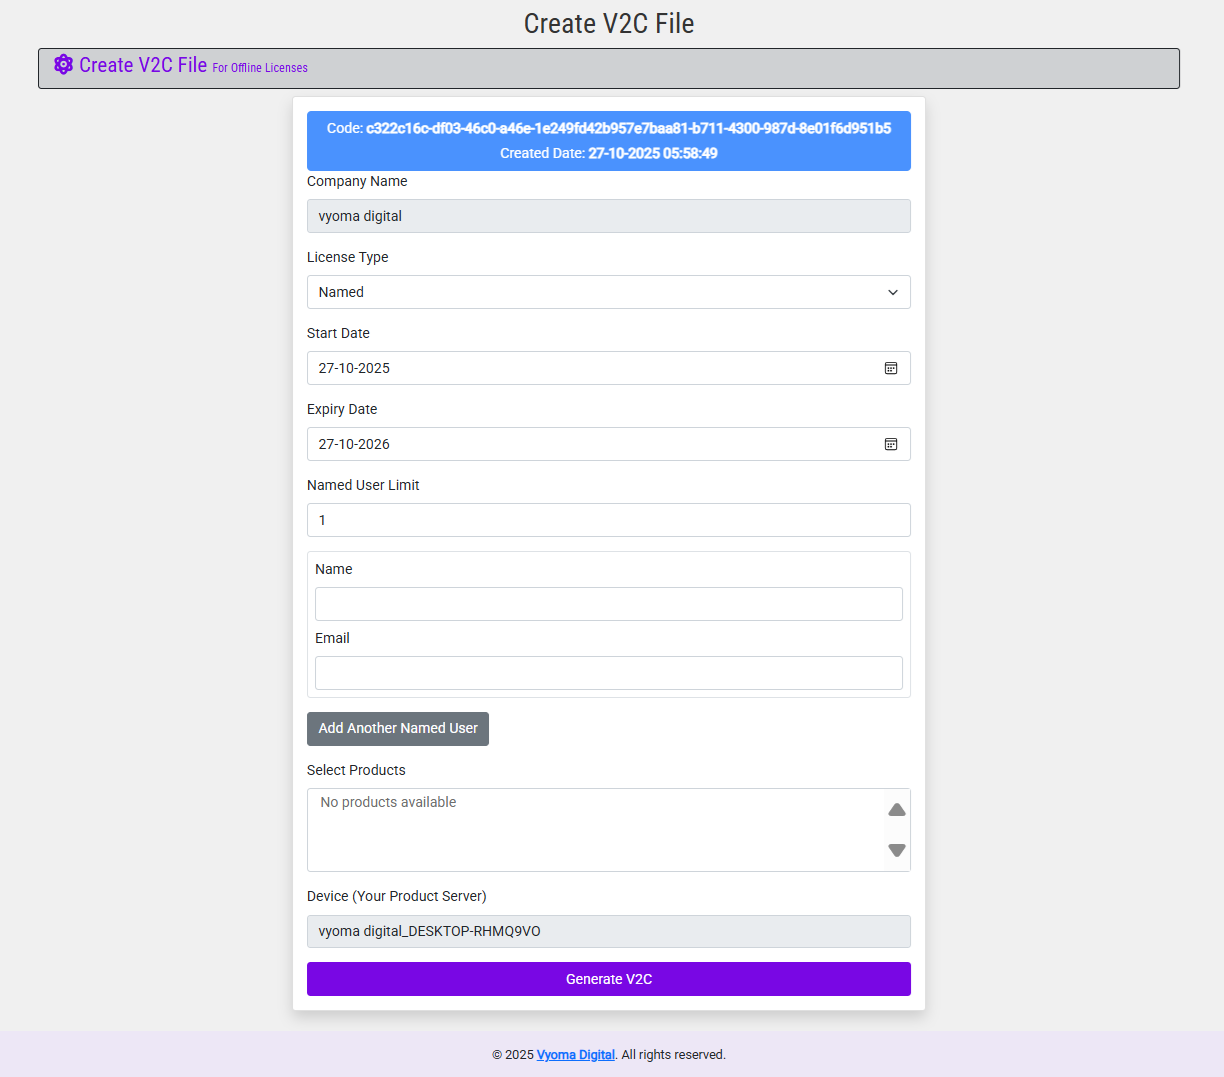
[ Screenshot: SaaS Portal Form] |
| 8. | The SaaS Portal processes the C2V and Generates the V2C (Vendor-to-Client) file. Download this V2C file. | V2C File |
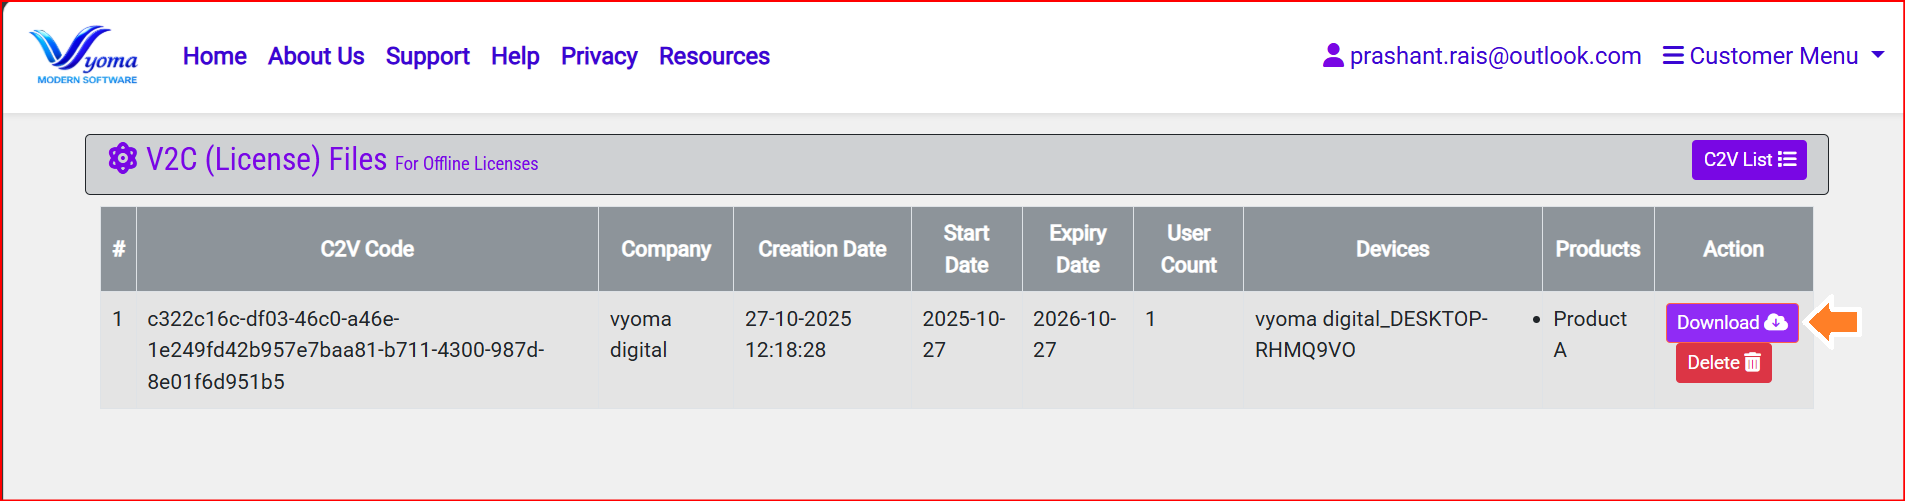
[ Screenshot: SaaS Portal "Download V2C" button] |
| 8. | Transfer and Apply: Take the V2C file and Upload it to the Client Application on your server. Your license is now in force! | V2C File & Client App |
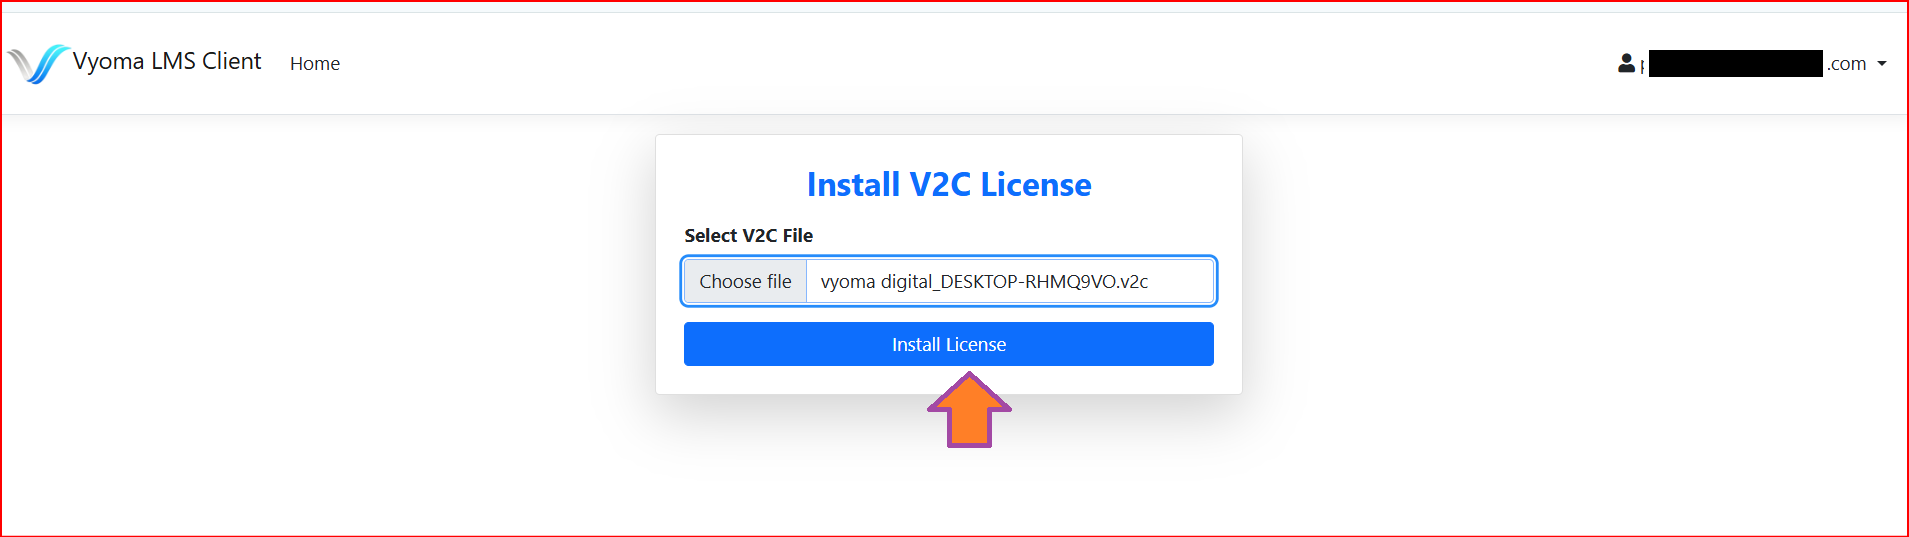
[ Screenshot: Client App showing "License Activated" confirmation] |
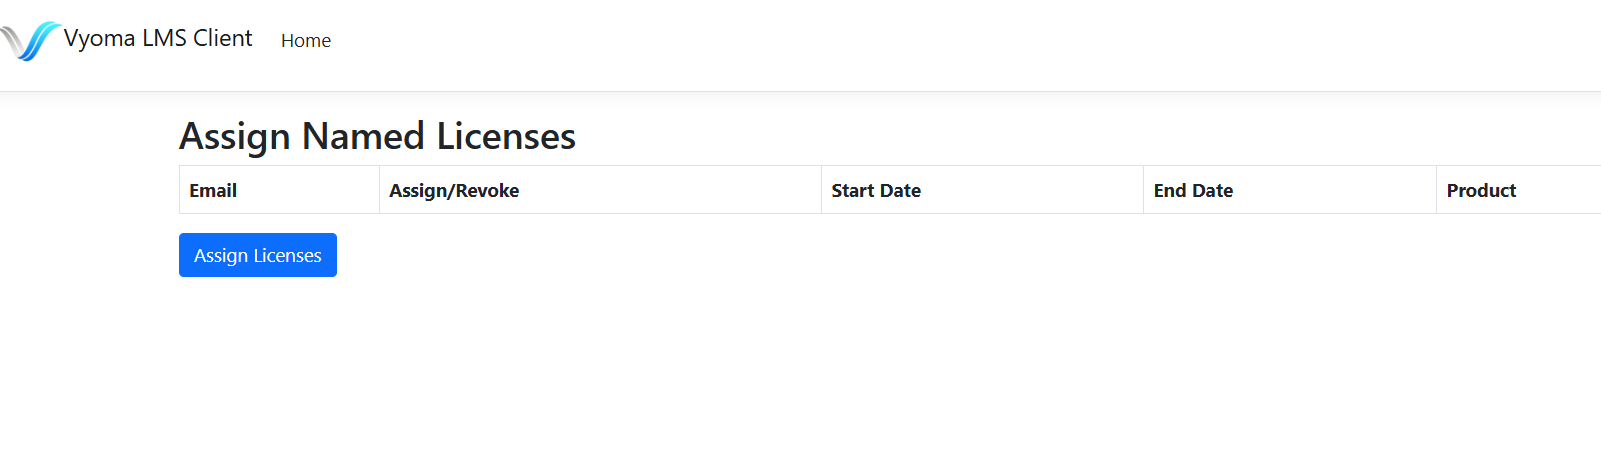
| 9. | Apply Named Licenses: If you have purchased Named Licenses, assign them to the users in the Client Application on your server. Your license is now in force! | Named Licenses & Client App |
[Screenshot: Client App showing "Assign Named Licenses"] |
| 10. | Track License Usage: Track realtime usage on the Dashboard | Client App Dashboard |
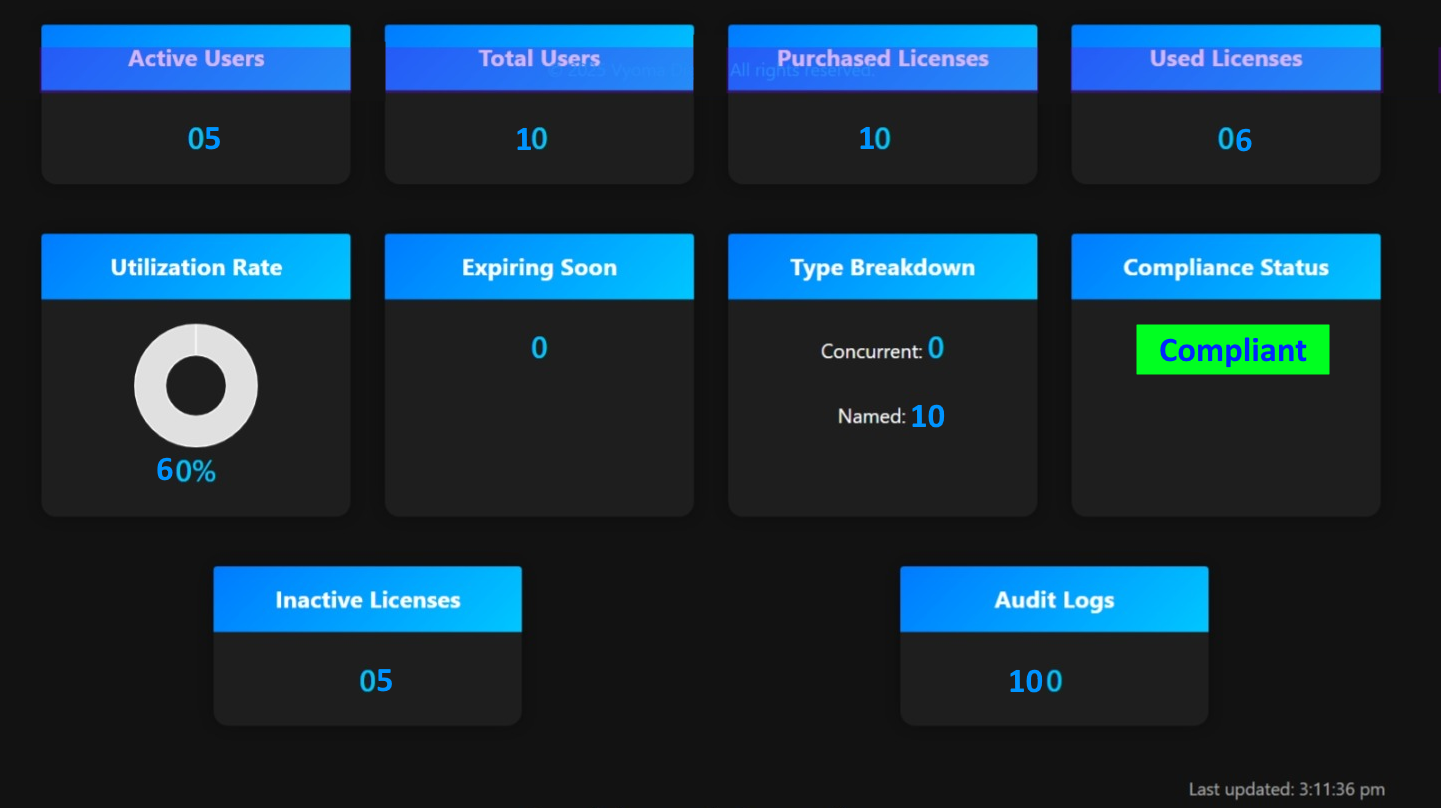
[Screenshot: Client App Dashboard"] |
Stage 4: License Enforcement
Once activated, There are two ways to integrate the License Enforcement.
| Step | Action | Key Feature | Visual Reference |
|---|---|---|---|
| 1 | Integration is NOT required (Zero Integration) if you use Endpoint Client in "Proxy Mode". The installed Client App works like a Proxy. It intercepts all incoming traffic, validates the license in real-time, and only permits access if the license check passes. | Endpoint License Enforcement Client App (Proxy Mode) |
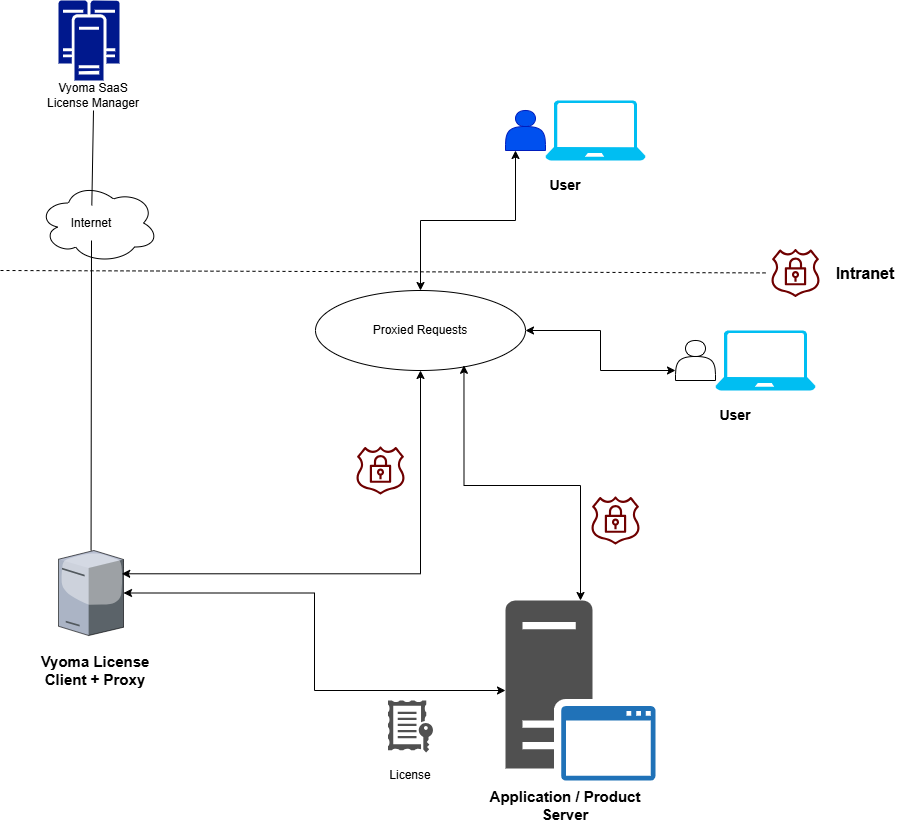
Conceptual Graphic: Diagram showing 'User' --> 'Client App (Proxy)' --> 'Web Application'. |
| -- OR -- | |||
| 2 | Integrate your product or application using API integration. It intercepts all incoming traffic, validates the license in real-time, and only permits access if the license check passes. | Endpoint License Enforcement Client App (Proxy Mode) |
See the API Integration Guide
|
For further assistance, please contact our support team.